Laser speckle photometry for inline characterization in the drying and calendering process

In battery cell production, production errors that are not detected or are detected too late lead to high reject rates and follow-up costs due to possible cell defects during operation. Fluctuations in electrode quality in the form of defects such as agglomerates, drying cracks, and porosity of the coating are a key source of errors, affecting load irregularities and cross-contamination.

The laser speckle photometry (LSP) method developed at Fraunhofer IKTS can ensure the reliability and optimal functioning of critical battery components. With its optimized process, LSP is a simple, flexible, and yet reliable tool for quality assurance of battery components in various process stages.
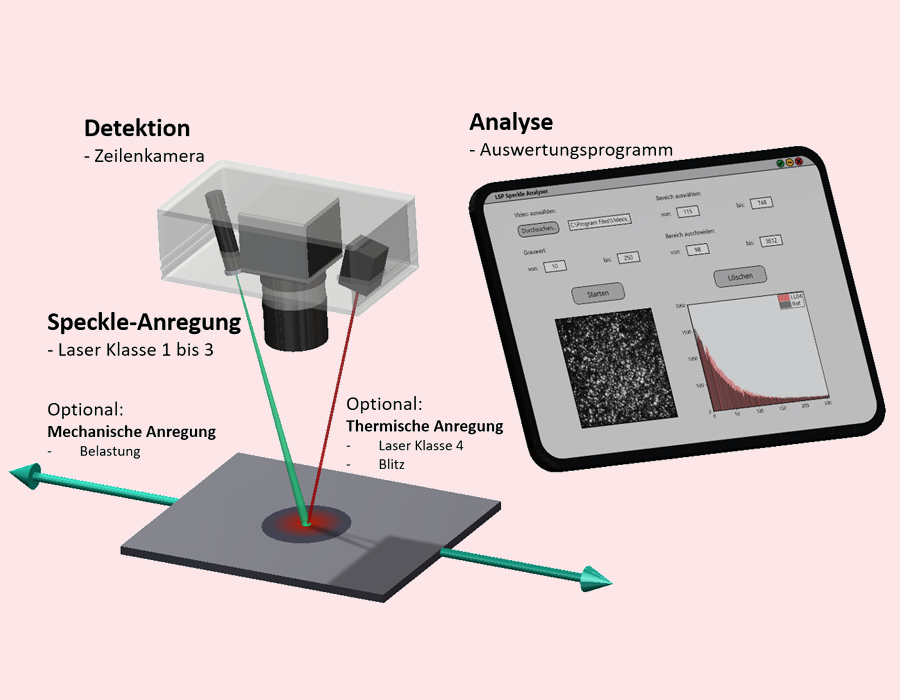
In this process, an optically rough surface is illuminated with a laser beam. Reflection on the surface creates interference patterns, known as speckles. These are recorded with the aid of a camera. The extremely short measurement times of LSP make the process ideal for inline use in industrial production and for in-situ measurements during maintenance and repair tasks. An important advantage of LSP is that it is not limited to one material class, but is suitable for measurements on metals and non-metals as well as organic materials, and is fast and contact-free.

Schematic structure of a laser speckle photometry measurement system for inline testing of electrode coating during drying and calendering.
© Fraunhofer IKTS
Schematic structure of a laser speckle photometry measurement system for inline testing of electrode coating during drying and calendering.
Laser speckle photometry laboratory demonstrator with all essential components for the testing of electrode coating.
© Fraunhofer IKTS
Laser speckle photometry laboratory demonstrator with all essential components for the testing of electrode coating.

Roughness is determined by analyzing the static speckle images. The LSP method has already been tested in series trials using a laboratory setup on metallic and ceramic samples. It is now possible to detect surface defects on metals and ceramics smaller than 10 µm using the speckle parameters. By developing suitable algorithms for evaluating the speckle images, measurement variables for identifying porosity have been defined.

At Fraunhofer ZESS, laser speckle photometry is being qualified for inline characterization in the drying and calendering process of lithium-ion batteries under laboratory conditions. The first step involved the detection of agglomerates of various sizes. The measurement data was evaluated using image processing methods based on spatial filtering. In addition, automated error detection algorithms were developed based on machine learning methods.

The use of laser speckle photometry is also conceivable for inline testing of battery electrodes after splitting and separation.

Resulting images from measurements in which the sample is illuminated by an LED source. Agglomerates (250 µm and 80 µm) can be seen in the marked areas.
© Fraunhofer IKTS
Resulting images from measurements in which the sample is illuminated by an LED source. Agglomerates (250 µm and 80 µm) can be seen in the marked areas.
Resulting images from measurements in which the sample is illuminated by a laser source. Agglomerates (300 µm to 1000 µm) are visible in the speckle images. They can be automatically detected using image analysis and machine learning algorithms.
© Fraunhofer IKTS
Resulting images from measurements in which the sample is illuminated by a laser source. Agglomerates (300 µm to 1000 µm) are visible in the speckle images. They can be automatically detected using image analysis and machine learning algorithms.